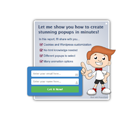
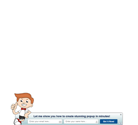
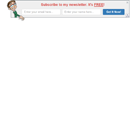
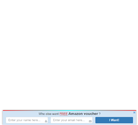
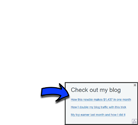
"Now everyone can design stunning popups and optin forms..."
Widget: (Not saved) Username: masterclass Manage | Logout
Type:
Animate:
Activate:
Advance:
Demo:
Gracefully appear in the middle of the browser.
Slides from the top or bottom of the browser.
Slides from any corner of the browser.
Inline with the content of your page, such as the end of your blog post. You can animate it when visible, hence gaining more attention.
No animation
(1 - 10)
px
%
%
ms
Showing frequency per visitor:
Do not show when this cookie exists:
>
Only show when this cookie exists:
>
Select where to show the widget: (For self-hosted Wordpress only)
|
|
|
|
|
|
|
|
|
|
|
Select the publishing platform:
Select where you want to put this widget:
(Note: Once this code is added, for future editing, you simply have to change it using this PopupXpert editor. The widget on your website will be updated automatically!)
(Note: Once this code is added, for future editing, you simply have to change it using this PopupXpert editor. The widget on your website will be updated automatically!)
Copy and paste the code below into the html file of your website where you want the widget to appear.
(Note: Once this code is added, for future editing, you simply have to change it using this PopupXpert editor. The widget on your website will be updated automatically!)
(Note: Once this code is added, for future editing, you simply have to change it using this PopupXpert editor. The widget on your website will be updated automatically!)
Copy and paste the code below into the html file of your website where you want the widget to appear.
Copy the code below and paste it into the html code of your website, IMMEDIATELY AFTER the end of the article content. (If you won't be using the option: 'When Scroll To End Of Post', then you can simply insert the code just before the </body> tag.)
Select the publishing platform:
(Note: Once this code is added, for future editing, you simply have to change it using this PopupXpert editor. The widget on your website will be updated automatically!)
Copy the code below and paste it into the html code of your website, IMMEDIATELY AFTER the end of the article content. (If you won't be using the option: 'When Scroll To End Of Post', then you can simply insert the code just before the </body> tag.)
(Note: Once this code is added, for future editing, you simply have to change it using this PopupXpert editor. The widget on your website will be updated automatically!)
(Note: Once this code is added, for future editing, you simply have to change it using this PopupXpert editor. The widget on your website will be updated automatically!)
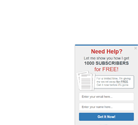
Enter your login info below:
Not a member? Join free!
Copy and paste the HTML signup form script provided by your autoresponder provider here. The system will merge it into this widget.
✖
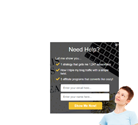
Quick Start Guide
Switch to Widget Designer Guide
This is a quick guide to get you started fast.
If you are simply looking around to see if this system is worth your time exploring further, click the Template button [Where?] and have fun trying out different templates. Edit them using the widget Designer [Where?]. Change the animation using the Animation Editor [Where?]. Click on Demo Full [Where?] to see them in action.
If you are ready to create a working widget, follow the following steps:
1) Log in to your LeadsLeap account (free sign up if you are not yet a member) [Where?]. You can create a widget without an account, but having an account allows you to save your work, track the performance of the widget and use other advanced settings.
2) Start designing your widget using our proprietary designing tools.
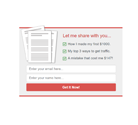
You can either save the opt-in info in your LeadsLeap account (by choosing Internal List) or link it to your 3rd party autoresponder (by choosing 3rd-Party Autoresponder). If you link it to your 3rd-Party Autoresponder, you can use the Import Form Details feature [Where?]. Simply login to your list management system, such as Aweber, Mailchimp etc, copy the HTML form code (the one that starts with <form ....> and ends with </form>, not the javascript version) and follow the instruction after clicking the Import Form Details button [Where?]. (Note: the number of input fields in your widget should match those in the mail form. Otherwise, you may end up with extra or missing fields.)
4) Click Get Code [Where?] to get the code for your website. The code generated will depend on the platform of your website and where you wish to place the code. Just follow the instruction given.
5) Advanced step: The system allows you to show different widgets for different devices. It is advisable that you create one widget for PC and one for mobile devices for better conversion rate. You can also split test different widgets and see which one converts better. All these can be done in the PopupXpert Manager.
If you are simply looking around to see if this system is worth your time exploring further, click the Template button [Where?] and have fun trying out different templates. Edit them using the widget Designer [Where?]. Change the animation using the Animation Editor [Where?]. Click on Demo Full [Where?] to see them in action.
If you are ready to create a working widget, follow the following steps:
1) Log in to your LeadsLeap account (free sign up if you are not yet a member) [Where?]. You can create a widget without an account, but having an account allows you to save your work, track the performance of the widget and use other advanced settings.
2) Start designing your widget using our proprietary designing tools.
- You can load a new template by clicking the Template button [Where?].
- Change the animation to your preference using the Animation Settings [Where?].
- Change the activation conditions to your preference using the Activation Settings [Where?]. (You can set when you want the widget to appear, how often it appears, customize it based on cookie settings and if you are adding to Wordpress, you can even customize which post/page you want it to be shown.)
- Change the design of the widget using our friendly Widget Designer [Where?]. You can learn more about the Widget Designer by clicking on "Switch to Widget Designer Guide".
You can either save the opt-in info in your LeadsLeap account (by choosing Internal List) or link it to your 3rd party autoresponder (by choosing 3rd-Party Autoresponder). If you link it to your 3rd-Party Autoresponder, you can use the Import Form Details feature [Where?]. Simply login to your list management system, such as Aweber, Mailchimp etc, copy the HTML form code (the one that starts with <form ....> and ends with </form>, not the javascript version) and follow the instruction after clicking the Import Form Details button [Where?]. (Note: the number of input fields in your widget should match those in the mail form. Otherwise, you may end up with extra or missing fields.)
4) Click Get Code [Where?] to get the code for your website. The code generated will depend on the platform of your website and where you wish to place the code. Just follow the instruction given.
5) Advanced step: The system allows you to show different widgets for different devices. It is advisable that you create one widget for PC and one for mobile devices for better conversion rate. You can also split test different widgets and see which one converts better. All these can be done in the PopupXpert Manager.
Widget Designer Guide
Switch to Quick Start Guide
The Widget Designer [Where?] allows you to add different kinds of HTML elements, including Text [Where?], Link [Where?], Icon [Where?], Background Block [Where?], Image [Where?] or videos, iframe, social network plugins through the use of Custom Code [Where?].
If you are creating an opt-in form, you can also add a submit button [Where?] and input fields [Where?].
Try adding a new element now and see what happen...
Once a html element is added to the widget, an editor for that element will be added. Styling the element is as easy as changing the parameters in the editor.
For each added "element editor", you will see these icons:
Below is an explanation of these icons:
You may notice that some element editors cannot be sorted, duplicated, locked nor deleted. These elements are the Base Dimensions [Where?], Close Button [Where?] and Credit [Where?]. Below is an explanation of what these elements are:
Base Dimensions [Where?] - This is an important section for you to set up the base dimension of the widget. (A note about the widget dimension: The base dimension is denoted by a faint dashed box. It is okay to place elements outside this box. The purpose of a dimension is for the widget placement during animation.)
Close Button [Where?] - This is the editor for the widget close button. A close button is only visible for Widget Type: lightbox, slidebar and cornerblock [Where?]. It is hidden for inline widget because a inline widget is part of the website content, hence should not be closed.
Credit [Where?] - This is the editor for the credit that links back to us. If you are a LeadsLeap member, this link will be embedded with your affiliate link.
Below are the basic operations:
If you are creating an opt-in form, you can also add a submit button [Where?] and input fields [Where?].
Try adding a new element now and see what happen...
Once a html element is added to the widget, an editor for that element will be added. Styling the element is as easy as changing the parameters in the editor.
For each added "element editor", you will see these icons:
| - Duplicate the element, so that you don't have to style a similar element all over again. | |
| - Sort the position of the html elements. Sorting them is only for better organization. It will not affect the layering of the element like what you see in graphic editors like Photoshop. To change the layering of the element, you'll have to edit a parameter called z-index, which can be found in the editor. | |
| - Delete the element. | |
| - Lock several elements together so that you can move them at the same time. You can set up to 9 different lock groups. |
You may notice that some element editors cannot be sorted, duplicated, locked nor deleted. These elements are the Base Dimensions [Where?], Close Button [Where?] and Credit [Where?]. Below is an explanation of what these elements are:
Base Dimensions [Where?] - This is an important section for you to set up the base dimension of the widget. (A note about the widget dimension: The base dimension is denoted by a faint dashed box. It is okay to place elements outside this box. The purpose of a dimension is for the widget placement during animation.)
Close Button [Where?] - This is the editor for the widget close button. A close button is only visible for Widget Type: lightbox, slidebar and cornerblock [Where?]. It is hidden for inline widget because a inline widget is part of the website content, hence should not be closed.
Credit [Where?] - This is the editor for the credit that links back to us. If you are a LeadsLeap member, this link will be embedded with your affiliate link.
Below are the basic operations:
| Move an element | 1) Change the
Top Offset and Left Offset parameters in the element editor, or 2) Drag and move the element, or 3) Click on and mouseover the element, then move it using the directional buttons on the keyboard. |
| Group move elements | Lock the elements together by clicking the button. Then move any of the elements using method
2 or 3 above. The other elements in the same group will move at the same time.
(Note: Changing the Top Offset and Left Offset parameters will only affect the position of that element, even if it is group locked.) |
| Cancel group move | Unlock the element by clicking the button before moving it. |
| Resize an element | 1) Change the Width and Height parameters in the element editor, or 2) Resize the element by dragging the corners. (If this option is available, you will see that the cursor will change to move arrow.) |
| Group resize elements | Not possible. |
| Open element editor | 1) Click on the element editor itself, or 2) Double-click on the html element. |
| Identify html element and its editor | Simply mouseover the html element and its editor will also be highlighted, vice versa. |
| Move an element in front of / behind another element | Change the z-index parameter in the element editor. |
Templates suitable for lightbox popups (or easily create your unique popup with a few clicks!)

Blank
Optin form
Go to ext. url

Optin form

Optin form

Stop!
Optin with video
Exit popup

Yes And No
Templates suitable for slidebars (or easily create your unique popup with a few clicks!)

Blank (bottom)

Blank (top)
Bottom bar

Go to ext. url
Top bar

bottom bar with remnant
Bottom bar
Templates suitable for cornerblocks (or easily create your unique popup with a few clicks!)

Blank
Promote blog posts
Optin box

Optin box with remnant
Optin box 2

Go to ext. URL
Templates suitable for inline widgets (or easily create your unique popup with a few clicks!)

Blank (End of post)

Blank (Sidebar)
End of post optin

End of post optin 2

Sidebar optin

Sidebar optin2
Import the JS code you've previously created. (For non-members who can't save their work.)
Load New Template
Base Dimensions
px |
px |
Opt-in Form Settings
Close Button
Position & Size
px |
px |
|
px |
Setting & Styling
Credit
Position & Size
px |
px |
Setting & Styling
px
Position & Size
px |
px |
|
px |
Setting & Styling
px
ID & Class
(for div tag)
(for div tag)
Position & Size
px |
px |
|
px |
Setting & Styling
px
ID & Class
(for a tag)
(for a tag)
Position & Size
px |
px |
|
px |
Setting & Styling
ID & Class
(for div tag)
(for div tag)
Position & Size
px |
px |
px |
px |
Setting & Styling
ID & Class
(for div tag)
(for div tag)
Position & Size
px |
px |
|
px |
px |
Setting & Styling
ID & Class
(for img tag)
(for img tag)
Position & Size
px |
px |
|
px |
px |
Setting & Styling
ID & Class
(for div tag)
(for div tag)
Position & Size
px |
px |
|
px |
px |
Button Setting & Styling
px
ID & Class
(for button tag)
(for button tag)
Position & Size
px |
px |
|
px |
px |
Setting & Styling
px
(Uncheck if it is optional)
ID & Class
(for input tag)
(for input tag)
px
px
px
px
px
px
px
px
Andale Mono
Arial
Arial Black
Arial Narrow
Arial Rounded MT Bold
Avant Garde
Baskerville
Big Caslon
Bodoni MT
Book Antiqua
Brush Script MT
Calibri
Calisto MT
Cambria
Candara
Century Gothic
Consolas
Copperplate
Courier New
Didot
Franklin Gothic Medium
Futura
Garamond
Geneva
Georgia
Gill Sans
Goudy Old Style
Helvetica Neue
Hoefler Text
Impact
Lucida Bright
Lucida Console
Lucida Grande
Lucida Sans Typewriter
Monaco
Optima
Palatino
Papyrus
Perpetua
Rockwell
Rockwell Extra Bold
Segoe UI
Tahoma
TimesNewRoman
Trebuchet MS
Verdana
Screen locked due to animation demo. End demo Repeat animation
1
1
masterclass
 Processing...
Initializing...

